Worried, you can’t buy a carbon filter for your grow tent? Out of pocket these days? Can’t endure the odor anymore!
Stop worrying, we’ve a solution! Don’t leave your plants alone!
Why not try to make this filter yourself instead of buying from the shop? Yes, it’s possible. YOU CAN DO IT!
Let’s read on, and know how to make a carbon filter for the grow room? It’s easy to make one for your grow room using simple household items. You can do it by using a pencil holder and long socks. So, follow the step by step guide below and build your own filter to make your plants grow happy and healthy.
Growers spend a lot of time searching and sizing the right filters. What happens then is that after one year they have to buy it again. If you make it yourself, you can save a few bucks and can make it again and again.
What Are The Basic Parts of Carbon Filter You Need to Now
Before we startup, let’s understand the basic parts of the carbon filter that we will deal with during our construction process. Here we are talking about air filters, not water ones. So, let starter with four fundamental units one by one
1. Pre-filter Cover
Pre-filter is an extra coating made up of polyester. It is attached with elastic bands to install before you put the filter. It works mainly to trap dust particles. It has little pores that stop any kind of fertilizer as well as spray extracts from entering inside the filter body. So, it acts as a protective outer coat. It can be washed and replaced easily if it gets too dirty.
2. Outer Body
The outer body of a carbon filter available in shops can be made up of durable cases or cylindrical jars. Sometimes these cases are made up of metal and are chemical resistant. Different types of filters are available with different materials used in the construction of the outer body. Its function is to provide an enclosure to carbon charcoal. These particles trap odor inside the pores and stop them from re-entering in air
3. Air Passage
It lies between the middle of two cylinders. It provides passage to the air to flow through it easily. Fresh air comes out from here after filtration and fans extract this fresh air and circulate it again
4. Activated Fine Carbon Granules
Depending on your setup, the inner side of the body is sealed with carbon granules. Sometimes it can be a pellet. But it’s good to utilize powder shaped granules instead of hard pellets as they would compact soon. In this way, plants get healthy air. The opening of this air passage should be the same as the diameter of the duct that would attach to inline fans.
How Does a Carbon Filter Work
Why call it a carbon filter? Probably this name is given to this device because there are actively carbon granules inside it to treat a wide range of odor molecules. When this carbon is exposed to oxygen, its porosity increases and it filters almost all types of contamination from the air. Thus the air that comes out of the filter is fresh and healthy for plants to breathe.
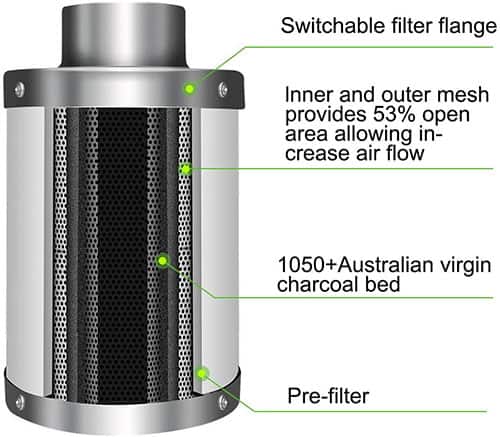
At first, the air passes through a pre-filter where all dust particles get trapped. It then moves to the inside body and pores of activated carbon sucks odor particles, allergens, harmful gases, and fumes. When these pores get filled completely, carbon turns to be compact. It’s time to replace the filter as it will not work anymore.
How To Make Cheap Carbon Filter With Household Items
Wanna save extra bucks? Yeah, make a carbon filter yourself with ordinary household items. These items are easily available at some local shops or you can buy these online.
Here is a list of items with available options and top recommendations.
Let’s have a look!
List of material needed:
| Names of Items needed | Available Options | Top Recommendations |
|---|---|---|
| Pre-filter | Polyester filter media Soft knee high socks | Hue woman flat knee high Socks Filtrete Air filters |
| Outer cover | Metal Pencil Holder Mesh wastebasket | Comix 4.1 inch pencil holder |
| Inner Body | Metal Pencil Holder PVC drain pipe | Flexi drain pipes |
| Activated Carbon | Activated carbon | Premium activated carbon |
| Other accessories | Measuring Tape Scissor Drill machine | Gardening tools kit |
7 Steps To Make Your Own Carbon Filter
Hey, we’re about to start the procedure. Almost all necessary supplies are ready now. Keep one important point in your mind that these steps are for 4 ducting system setup.YOU can switch to higher dimensions if you want to construct a 6” or 8” ducting system.
Let’s begin with the first step!
1. Arrange the two pencil holders for the outer body
This step is a crucial one because we arrange pencil holders as if the smaller goes inside the bigger one. We think from all parameters like dimensions, length, and height. Let’s see how!
- Height: Smaller holder should be 3/4th lower than the height of the bigger one
- The diameter: The diameter of the small jar should be the same as that of ducting. You can pre-check it by measuring the circumference
- Distance: Both holders should be 12-24mm away from each other.
2. Drill holes in the bottom of the holder
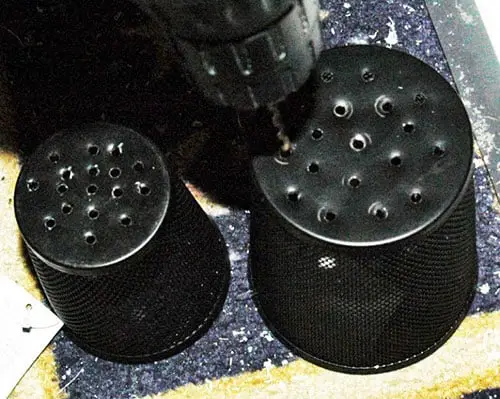
To ensure airflow, drill the bottom of the holders with a drill machine. You should drill at least 5 to 10 holes depending on the diameter of the bottom. Be careful whilst drilling as these holders are made up of relatively less hard aluminum. Bits of 5/32 will do the best job here.
3. Wrap upholders by putting separate socks
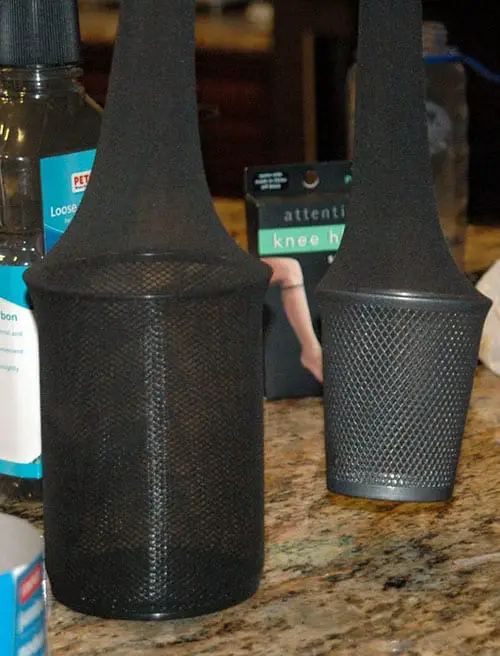
It’s time to put on socks on both holders. Make sure that socks should cover the whole jar. It should be open from upperside. For this, you should insert the button side of the holder first and then wrap all sides uniformly.
4. Pour finely granulated carbon in bigge holder
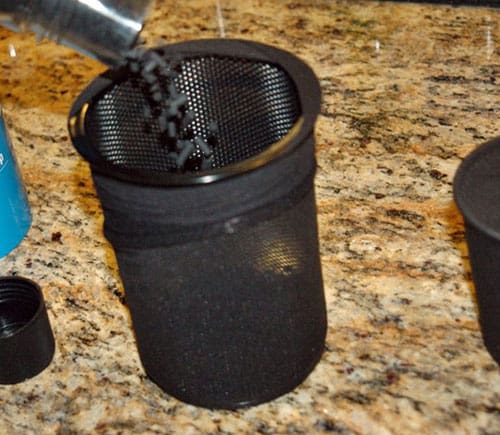
Now we are at the heart of the procedure. Fill a bigger holder with activated carbon. Remember don’t fill it up to the mouth just fill it up to half of its length. To distribute the granules equally in the holder, pull the socks in a way that they all settle from bottom to upper side. Make sure your carbon should be chopped finely.
5. Put smallholder inside the bigger one to seal activated carbon
Now put the smaller holder already wrapped in a sock inside the bigger cup filled with carbon. To avoid carbon granular wastage wrap socks of the bigger holder to the smaller holder and then adjust it inside the bigger one. Keep adjusting until the opening of both gets to the same level. Make sure that the bottom of holders has a uniform distribution of carbon granules.
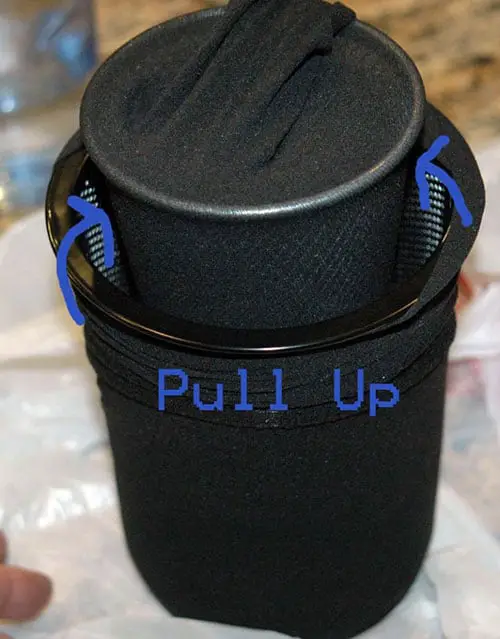
6. Adjust the socks off the inner mesh
Now pull off the socks of the inner cup so as its opening of both are at the same point. Now adjust the cups upside down to evenly distribute carbon particles.
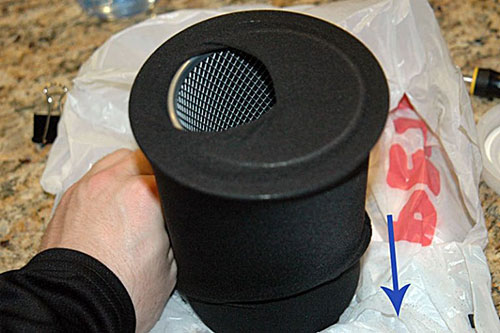
7. Attach it to 4 ducting fan
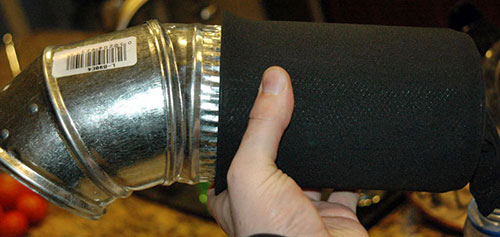
Finally check the positioning of both holders and attach it to the duct from the opening portion of socks. The duck will further attach to the inline fan. The system is almost ready and secure. To fasten the connection to the duct, use a zip tie and keep it sealed and locked properly.
Important Points You Need To Check
To ensure this setup works as an original carbon filter keep a few points in your mind and do any mistakes here. Let’s read on!
- Choosing a pencil cup can be tricky. If you go on for cups that are of equal diameters.,you can’t take the work of a carbon filter from this setup. So, always choose holders with a recommended diameter
- Be careful while buying carbon granules. Here go for finely chopped ones. Don’t buy pellets.
- Align the bottom of the holders in a way that carbon is equally distributed between both of them
- Wrapper the connection with duct tapes whilst inserting duct
- If you feel constant smell after the filter, then it’s time to replace it
What To Change For Making Bigger Carbon Filter
If you are growing in a big room then you can still make a bigger one with the above-mentioned procedure. However, you have to change the size of few items according to your need
- Make your own jars instead of pencil holders by drilling holes or use big trash bins
- Polyester filter instead of sock
- PVC drain pipe of diameter equal to the diameter of smaller holder or jar
Here you can use your six senses further to pick up anything you find the best alternative for others. Here is another video that can help you to DIY carbon filter.
When You Should Replace Your Carbon Filter
Wow.filter is ready now. How long will it work? How I will guess it’s time to replace it? This and a series of other questions are always there in the mind of growers. Under ideal conditions, temperature, and humidity control, a carbon filter can work up to 12 months.
When you observe constant odor even after a carbon filter, it’s an indication that your filter is expired. Now you should change it with the neo one.YOu can easily do it by replacing carbon granules and installing it again. It’s not such a hard process and costly to make it again and again.
Related Articles: Do You Need Carbon Filter For Grow Tent?
Bottom Line
Now, We made it easy for you to prepare your own carbon filter. Instead of spending a lot of money, why not try it yourself. With simple items that you can even pick from your house. So, buckle up yourself and follow the instructions above. The items we used are by no means final, you can use anything you find suitable to hold charcoal particles. But keep the measurements in your mind to get expected results.
Don’t forget to share the pics of your handmade filter below. We love to get some Info from your experience.


