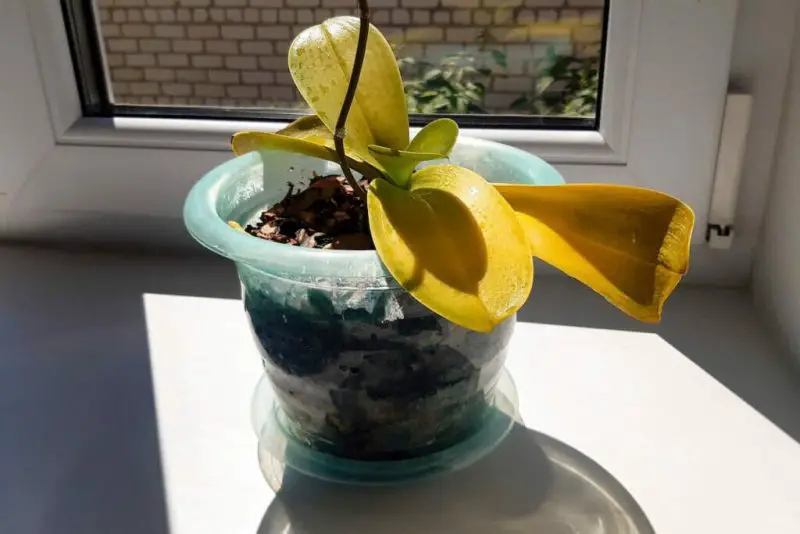
Loved for their delicate blossoms and unique allure, orchids are some of the most elegant and popular houseplants. However, even experienced growers sometimes notice their orchid leaves turning yellow, which can be alarming. Yellowing leaves may indicate a natural process, but it can also be a sign of stress or improper care.
Understanding why orchid leaves turn yellow and learning how to fix the problem quickly can help you restore your plant’s health and keep it thriving for years.
Table of Contents
Understanding Why Orchid Leaves Turn Yellow
Natural Aging of Orchid Leaves
The first thing to understand is that some yellowing of orchid leaves is completely natural. As orchids grow, older leaves at the bottom of the plant eventually age and die off, turning yellow before they drop. This is a normal part of the plant’s life cycle and does not indicate poor health. If only one or two lower leaves are yellowing while new leaves and roots look healthy, there is no reason to worry. The plant is simply redirecting its energy to new growth and flowers.
Watering Problems and Root Health
Overwatering or underwatering is one of the most common reasons orchid leaves turn yellow. Orchids require a delicate balance of moisture because their roots are adapted to absorb air as well as water. Overwatering can suffocate the roots, causing root rot and making it difficult for the plant to absorb nutrients. As the roots begin to fail, the leaves show stress by turning yellow and eventually soft and mushy.
On the other hand, underwatering deprives the plant of sufficient moisture, leading to dehydration. Dehydrated orchids often develop yellowing leaves that feel thin and wrinkled. Both watering extremes disrupt the plant’s nutrient and water uptake, and leaves reflect this stress through discoloration.
Lighting Conditions and Sunburn
Light plays a crucial role in orchid health, and improper lighting can cause yellow leaves. Too little light prevents orchids from photosynthesizing properly, leading to pale, yellowing leaves. Orchids that are kept in dark corners or far from natural light often suffer from slow growth and weak leaves.
Conversely, too much direct sunlight can cause sunburn, which manifests as yellow patches or streaks on the leaves. Orchids prefer bright, indirect light, and exposure to intense sun, especially through glass windows, can scorch their sensitive leaves.
Nutrient Deficiencies and Fertilizer Issues
Orchids need specific nutrients to grow well, and deficiencies can cause yellowing leaves. Nitrogen is essential for leaf health, and a lack of nitrogen may cause older leaves to turn yellow as the plant uses stored nutrients for new growth. Magnesium and iron deficiencies can also lead to yellowing, often starting between the leaf veins.
Over-fertilization can be equally problematic. Too much fertilizer, especially when salts build up in the growing medium, can burn the roots, limiting nutrient absorption. This results in yellowing leaves and stunted growth. Proper fertilization with balanced orchid food is key to maintaining healthy leaves.
Temperature and Humidity Stress
Orchids are tropical plants that thrive in stable, warm environments with moderate to high humidity. Sudden temperature changes or exposure to cold drafts can stress the plant, causing leaves to yellow and drop prematurely. Low humidity also affects the plant’s ability to retain moisture, leading to leaf discoloration and dryness.
Pests and Diseases
Pest infestations or fungal and bacterial infections can also be responsible for yellow orchid leaves. Spider mites, aphids, and scale insects feed on orchid leaves, causing discoloration and weakening the plant. Fungal infections often produce yellowing along with black or brown spots, while bacterial infections may cause wet, mushy yellow patches on the leaves.
How to Fix Yellow Orchid Leaves Quickly
Correcting Watering Habits
One of the fastest ways to help yellowing orchids is by adjusting watering practices. Check the roots to determine if overwatering or underwatering is the issue. Healthy orchid roots are firm and green or silvery white, while rotting roots appear brown and mushy. If root rot is present, trim away damaged roots, repot the orchid in fresh, well-draining medium, and water only when the potting mix is nearly dry.
For underwatered orchids, gradually increase watering to rehydrate the plant, ensuring water reaches the roots without leaving the potting mix soggy. Maintaining a consistent watering schedule based on the orchid’s environment helps prevent future yellowing.
Improving Light Conditions
Evaluate the orchid’s lighting to ensure it is receiving bright, indirect light. Move the plant closer to a window with filtered sunlight or use a sheer curtain to protect it from harsh rays. If light levels are too low, consider supplementing with artificial grow lights designed for orchids. Adjusting light exposure often restores the green color of leaves as the plant resumes healthy photosynthesis.
Providing Proper Nutrition
Fertilize orchids with a balanced orchid fertilizer, typically one labeled 20-20-20 or specifically formulated for epiphytic orchids. Feed lightly during active growth, usually every two weeks, and reduce fertilization when the plant is dormant or flowering. If nutrient deficiency is suspected, flushing the potting medium with clean water before resuming fertilization can remove built-up salts that may block nutrient absorption.
Managing Temperature and Humidity
Keep orchids in a stable environment with temperatures between 65°F and 75°F during the day and slightly cooler at night. Avoid placing orchids near air vents, heaters, or drafty windows. Increasing humidity to 50–70% by using a humidity tray or room humidifier can also reduce stress and improve leaf color.
Treating Pests and Diseases
Inspect the plant carefully for signs of pests or infections. Wipe leaves with a damp cloth to remove visible pests, and if infestations persist, use insecticidal soap or neem oil. For fungal or bacterial issues, isolate the affected plant, trim damaged leaves, and apply an appropriate fungicide or bactericide. Keeping the plant’s environment clean and ensuring good air circulation reduces the risk of future infections.
When Yellow Leaves Are Not a Problem
Not all yellow leaves indicate trouble. As mentioned earlier, older orchid leaves naturally turn yellow and fall off as part of the plant’s growth cycle. If only the lowest leaves are affected and the rest of the plant looks healthy, there is no need to intervene. Simply allow the yellow leaves to detach naturally or gently remove them when they are dry and loose.
Preventing Future Yellowing
Maintaining Consistent Care
The best way to prevent yellow leaves is through consistent orchid care. Provide the right balance of water, light, and nutrients, and monitor environmental conditions regularly. Avoid sudden changes in care routine, as orchids respond best to stable conditions.
Repotting When Necessary
Repotting orchids every one to two years helps maintain healthy roots and prevents issues caused by decomposing potting media. Fresh medium allows better airflow and drainage, reducing the risk of root rot and nutrient imbalances that lead to yellow leaves.
Regular Monitoring
Inspecting orchids weekly helps catch early signs of stress before yellowing becomes severe. Check roots, leaves, and growing media for pests, rot, or dryness. Addressing minor problems quickly can prevent more serious damage and keep your orchid looking vibrant.
FAQs about Orchid Leaves Turning Yellow
Why do orchid leaves turn yellow naturally?
Orchid leaves sometimes turn yellow as part of their natural aging process. Older bottom leaves eventually die off while the plant focuses energy on new growth.
Can overwatering cause yellow orchid leaves?
Yes. Overwatering can lead to root rot, making it difficult for roots to absorb nutrients and water properly, which results in yellowing, soft, and mushy leaves.
Do orchids need direct sunlight to prevent yellow leaves?
No. Orchids prefer bright, indirect light. Too much direct sunlight can burn the leaves, causing yellow patches, while low light can make leaves pale and weak.
What fertilizer prevents yellowing leaves in orchids?
A balanced orchid fertilizer, such as 20-20-20 or one designed for epiphytic orchids, provides essential nutrients to keep leaves healthy and green when used correctly.
Should yellow orchid leaves be removed?
If leaves are naturally aging and dry, they can be gently removed. However, if yellowing is caused by stress or disease, fix the underlying issue before removing them.
Conclusion
Yellow orchid leaves can be caused by various factors, ranging from natural aging to care-related issues like improper watering, lighting, or nutrient deficiencies. Understanding why orchid leaves turn yellow is the first step in restoring your plant’s health. By adjusting watering habits, providing proper light, feeding with balanced fertilizer, and maintaining stable temperature and humidity, you can fix yellowing leaves quickly and encourage lush, green growth.
In many cases, yellow leaves are simply a normal part of the orchid’s life cycle, especially when older lower leaves are involved. With consistent care, regular monitoring, and quick action when problems arise, your orchids can thrive and continue producing stunning flowers year after year.