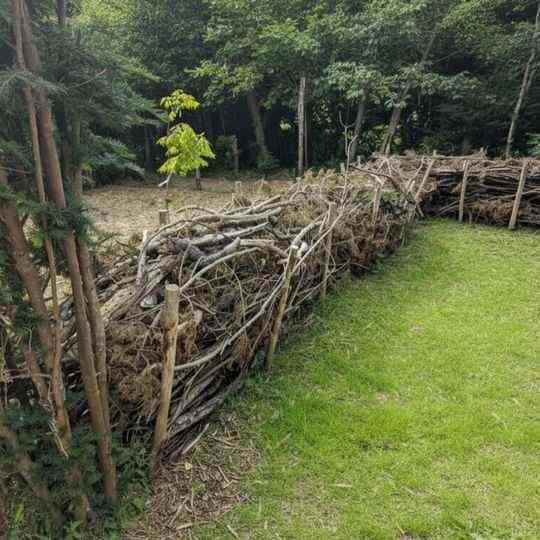
A dead hedge is one of the simplest ways to turn garden “waste” into something useful, beautiful, and wildlife-friendly. Instead of hauling away pruned branches, twiggy cuttings, and woody debris, you stack them into a structured line supported by stakes. The result is a natural barrier that functions like a hedge or low fence—without needing living shrubs, irrigation systems, or years of waiting for plants to fill in.
Despite the slightly grim name, a dead hedge is very much a living feature in the ecological sense. It becomes a shelter, food source, and travel corridor for countless organisms. Historically, dead hedges were widely used across parts of Europe as practical fencing and boundary markers, particularly in rural areas where people relied on local materials for everything. Today, they’re making a comeback because they align perfectly with modern sustainable gardening: reuse what you already have, improve habitat, reduce landfill waste, and build resilient outdoor spaces with minimal inputs.
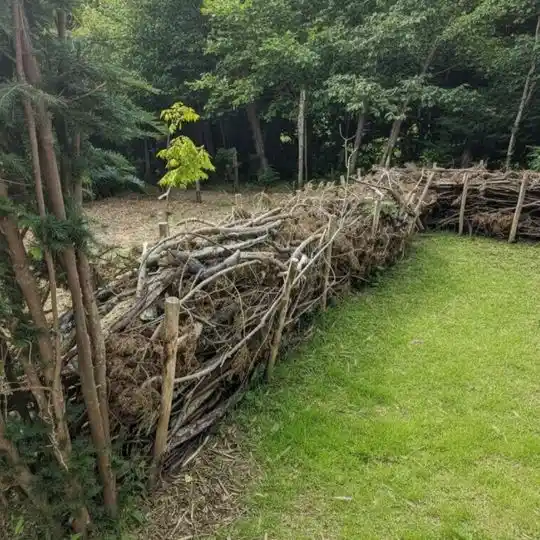
Dead hedges are especially valuable in difficult garden spots—areas with thin soil, heavy shade, drought conditions, or high winds where traditional hedges struggle. They can be placed at the edge of a property, around a vegetable patch, along a driveway, or even within a larger landscape design as a rustic divider. Done well, a dead hedge looks intentional rather than messy, blending into naturalistic gardens while quietly doing a lot of ecological work.
Table of Contents
Why Build a Dead Hedge? Practical and Ecological Benefits
Dead hedges offer benefits that go well beyond “it’s a free fence.” They solve real garden problems while supporting wildlife and soil health.
1) Wildlife Habitat and Biodiversity Boost
A dead hedge provides layered shelter, which is exactly what many animals need. The gaps between branches create protected spaces for insects, spiders, frogs, and small mammals. Birds may perch on it, forage within it, or even nest nearby if the hedge is tall and dense enough. Over time, the structure becomes a miniature ecosystem: insects lay eggs in crevices, decomposers break down organic matter, and predators (like birds and beneficial beetles) show up to feed. In suburban areas where wildlife habitat is fragmented, a dead hedge can function like a micro “wild corridor,” helping species move safely between spaces.
2) Natural Windbreak and Erosion Control
Because dead hedges are semi-porous (they allow some air through), they slow wind rather than creating strong turbulence. That’s useful if you’re trying to protect delicate plants or reduce soil drying in exposed areas. In windy gardens, dead hedges can also reduce erosion, particularly where bare soil is vulnerable. Even a low dead hedge can noticeably calm a harsh microclimate.
3) Waste Reduction and Low-Cost Building Material
Dead hedges are a form of on-site recycling. Instead of sending woody debris to landfill—or even hauling it for municipal green waste processing—you keep it in your garden and put it to work. This approach cuts down transportation waste and turns pruning into a resource. It’s one of the most cost-effective landscape structures you can build: your main “materials” are what your garden produces anyway.
4) Soil Improvement Over Time
While dead hedges aren’t compost piles, they behave like slow, structured decomposition zones. As the branches break down, they feed soil organisms and gradually contribute organic matter to the ground beneath and beside the hedge. This can improve soil structure over time, particularly in poor or compacted areas. In addition, by reducing wind exposure, dead hedges help soil retain moisture, which supports microbial activity and root health in nearby plants.
5) Aesthetic Value: Rustic, Natural, Intentional
Many gardeners initially worry a dead hedge will look like a pile of sticks. The difference between messy and intentional is structure: aligned stakes, an even footprint, and consistent stacking. When built thoughtfully, a dead hedge adds a natural design element that fits cottage gardens, woodland gardens, permaculture layouts, and wildlife-friendly landscapes. It can be tidy or wild-looking depending on your style, but either way it reads as organic and grounded.
Environmental Impact: Why Dead Hedges Are a Net Positive

From an ecological perspective, dead hedges punch above their weight. They support biodiversity, reduce waste, and enhance the garden’s ability to function as a healthy micro-ecosystem. By using untreated, natural materials that would otherwise be discarded, you reduce waste streams and keep carbon “in place” longer. Instead of immediately turning woody debris into CO₂ through burning or rapid industrial processing, a dead hedge decomposes slowly, returning nutrients to the soil over time.
Dead hedges also provide something increasingly rare: structural habitat. Many modern gardens are simplified—short lawns, trimmed shrubs, clean borders—leaving fewer hiding places for insects and small animals. A dead hedge restores complexity, which is one of the keys to ecological resilience. More complexity generally means more niches, which means more species can coexist.
Materials You’ll Need
The best dead hedges rely on a mix of strong structure and flexible filling. You don’t need perfect materials, but you do want enough variation to make the hedge stable and dense.
Core Materials
-
Branches and twigs (a mix of thick and thin)
Hardwood branches (oak, beech, ash, etc.) typically last longer, but any untreated wood is useful. -
Stakes or posts for support
These can be sturdy branches, cut poles, or any untreated wooden stakes strong enough to withstand pressure. -
Filler material
Small twigs, leaf litter, brambles, and hedge trimmings help fill gaps and create density.
Important Safety Note
Avoid treated wood or anything painted/chemically preserved. You don’t want chemicals leaching into soil or harming insects and amphibians that may use the hedge.
Step-by-Step Guide to Building a Dead Hedge
You can build a dead hedge in a few hours for a short run, or over a weekend for a longer boundary. The process is straightforward, but a good build depends on getting the foundation and spacing right.
Step 1: Choose the Right Location
Start by deciding what you want the hedge to do:
-
Boundary marker along a path or property edge
-
Windbreak near exposed beds
-
Wildlife strip in a quieter corner
-
Visual divider between garden zones
Ideally, choose ground that is reasonably level. Slight slopes are fine, but steep slopes may require terracing or extra stakes for stability. Also consider how the hedge will interact with the rest of your garden: you don’t want it shading sun-loving plants if it will be tall.
Step 2: Gather and Sort Materials
Collect your branches and sort them roughly into:
-
Thick, sturdy branches (for the base and structure)
-
Medium branches (for bulk)
-
Thin twigs and leafy material (for filling gaps)
Having this mix matters. If you build only with thick branches, the hedge will be airy and unstable. If you build only with thin twigs, it may collapse or blow apart in wind.
Step 3: Prepare the Ground
Clear the line where the hedge will sit. Remove large weeds, rocks, or uneven clumps that prevent stakes from going in straight. If needed, lightly level the area.
Mark the hedge line using string, spray paint, or small guide stakes. This helps you keep the hedge footprint consistent, which improves stability and looks more deliberate.
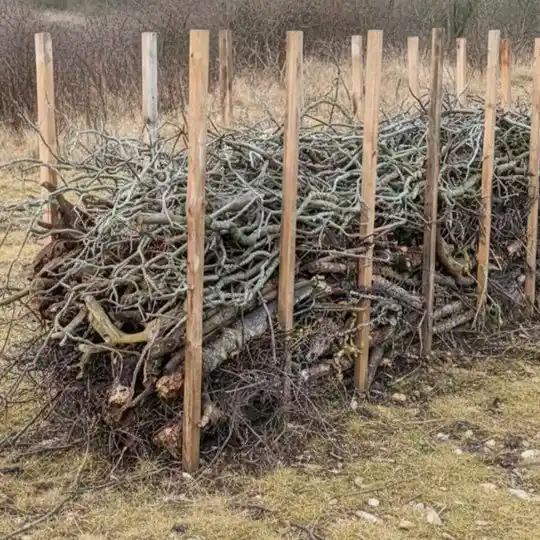
Step 4: Install the Stakes
Stakes are the skeleton of a dead hedge. A common approach is a double row of stakes, which creates a channel you can pack full of branches.
-
Drive stakes into the ground along both sides of the hedge line.
-
Space stakes about 30–60 cm (1–2 feet) apart.
-
Keep the two rows about 30–50 cm (12–20 inches) apart, depending on how thick you want the hedge.
-
Push stakes deep enough that they won’t wobble (a firm, stable stake prevents collapse later).
If your soil is very loose, use thicker stakes or drive them deeper. If the area is windy, tighter spacing will help.
Step 5: Build a Strong Base Layer
Start with the thickest branches and lay them horizontally between the stakes, packing them in tightly. This base is critical. A weak foundation leads to a hedge that slumps, leans, or collapses.
A good base should be heavy, interlocked, and anchored by the stakes. Think of it like laying the first layer of a dry-stone wall: it doesn’t have to be perfect, but it must be stable.
Step 6: Add Layers and Fill Gaps
Once the base is set, continue stacking:
-
Alternate branch directions to “weave” the structure together.
-
Add medium branches for bulk and strength.
-
Use thin twigs, brambles, and leafy debris to fill gaps and make the hedge denser.
As you build upward, step back occasionally and check for leaning. If one side is bulging, redistribute material and compress it.
Most dead hedges end up between 90–180 cm (3–6 feet) tall, depending on purpose. For a wildlife hedge, even 60–90 cm can be valuable. For a boundary barrier, taller is better.
Step 7: Secure the Top
To finish, use flexible branches (like willow or other bendy cuttings) to lightly weave across the top and around stakes. This helps lock the hedge together and prevents materials from lifting in strong wind.
If you want a more polished look, you can trim protruding ends with secateurs—but it’s not necessary unless you’re aiming for a very tidy result.
Step 8: Maintain Over Time
Dead hedges are low maintenance, but they do settle and decompose.
-
After storms, check for loosened sections.
-
Every few months (or seasonally), add more prunings to keep the hedge dense.
-
If gaps form, stuff them with smaller twigs and leafy material.
-
Replace stakes if they rot after several years (hardwood stakes last longer).
Maintenance is often just “keep feeding it.” The hedge becomes a living recycling system for woody garden waste.
Common Mistakes to Avoid
A dead hedge is forgiving, but a few errors can cause frustration:
-
Using treated wood: risks chemical leaching and harms wildlife.
-
Not enough stakes or spacing too wide: leads to slumping and collapse.
-
A weak base layer: the whole hedge becomes unstable.
-
Building too airy: wildlife prefers dense cover, and wind will pull loose material out.
-
Neglecting after severe weather: quick checks prevent bigger repairs later.
Conclusion: A Dead Hedge as a High-Impact Garden Upgrade
Dead hedges are a rare garden feature that delivers function, sustainability, and ecological value at the same time. They create habitat, reduce waste, soften wind, protect soil, and add a natural structure that can anchor your garden design. They’re also flexible: you can build a short one as a decorative border, or a long one as a serious boundary hedge—then expand over time as you collect more prunings.
If you want your garden to support more birds, beneficial insects, and small wildlife—while also cutting down on waste and maintenance—a dead hedge is one of the most effective projects you can take on. It’s traditional for a reason: it works, it’s simple, and it turns what you already have into something your garden can use for years.