
Aloe vera, with its succulent green leaves and soothing gel, is one of the easiest houseplants to grow. But just like any plant, your aloe will outgrow its pot eventually. If it’s top-heavy, rootbound, or producing pups, it’s time to give it a new home. In this detailed guide, you’ll learn everything you need to know about how to repot aloe vera, from signs it’s time to repot, to choosing the right soil and container, and how to do it without damaging the plant.
Whether you’re a beginner or a seasoned plant parent, this guide on repotting aloe will walk you through the process step by step.
Why You Should Repot Aloe Vera
Aloe vera plants don’t need frequent repotting, but there are a few important reasons to do it every couple of years:
- Prevents root crowding: Aloe roots need space to grow. A crowded root ball can slow down growth or even rot.
- Refreshes the soil: Over time, soil loses nutrients and becomes compacted. Fresh potting mix helps support healthy roots.
- Removes pups: Aloe plants often grow offsets (baby plants) that compete for resources. Repotting lets you divide and replant them.
- Helps with drainage: If your current pot doesn’t drain well, your aloe is at risk for root rot.
When to Repot an Aloe Plant
The best time to repot aloe vera is in the spring or early summer, during its active growing season. This gives the plant time to recover from transplant shock and establish roots in its new environment.
Avoid repotting in winter unless absolutely necessary, as aloe growth slows down in cold months and the plant becomes more vulnerable to damage.
Signs Your Aloe Vera Needs Repotting
Here are a few clear indicators that it’s time for repotting your aloe plant:
- Roots are growing out of the drainage holes
- Leaves are drooping or becoming soft
- Soil dries out too quickly
- The plant is top-heavy and falling over
- White crust (salt buildup) forms on the soil
- Pups (baby aloes) are crowding the base
- Soil smells sour (a sign of poor drainage and potential rot)
What You’ll Need
Before you start replanting an aloe plant, gather these materials:
- A new pot (1–2 inches larger than the old one)
- Well-draining cactus or succulent potting mix
- Gardening gloves (optional but helpful)
- A small trowel or spoon
- A clean knife or scissors (for trimming dead roots or separating pups)
- Rubbing alcohol (to sterilize tools)
- A watering can (for post-repotting care)
Choosing the Right Pot and Soil
✅ Best Pot for Aloe Vera
- Material: Terracotta or unglazed ceramic pots are ideal because they’re breathable and help the soil dry faster.
- Drainage: Always choose a pot with drainage holes to prevent soggy roots.
- Size: The new pot should be just slightly larger than the old one—too large, and the soil will retain too much moisture.
✅ Best Soil for Aloe Vera
Use a commercial cactus or succulent mix. You can also make your own by combining:
- 2 parts potting soil
- 1 part perlite or pumice
- 1 part coarse sand
Avoid moisture-retentive soil or peat-heavy mixes.
Step-by-Step Guide to Repotting Aloe Vera
Let’s break down the process of repotting aloe step by step:
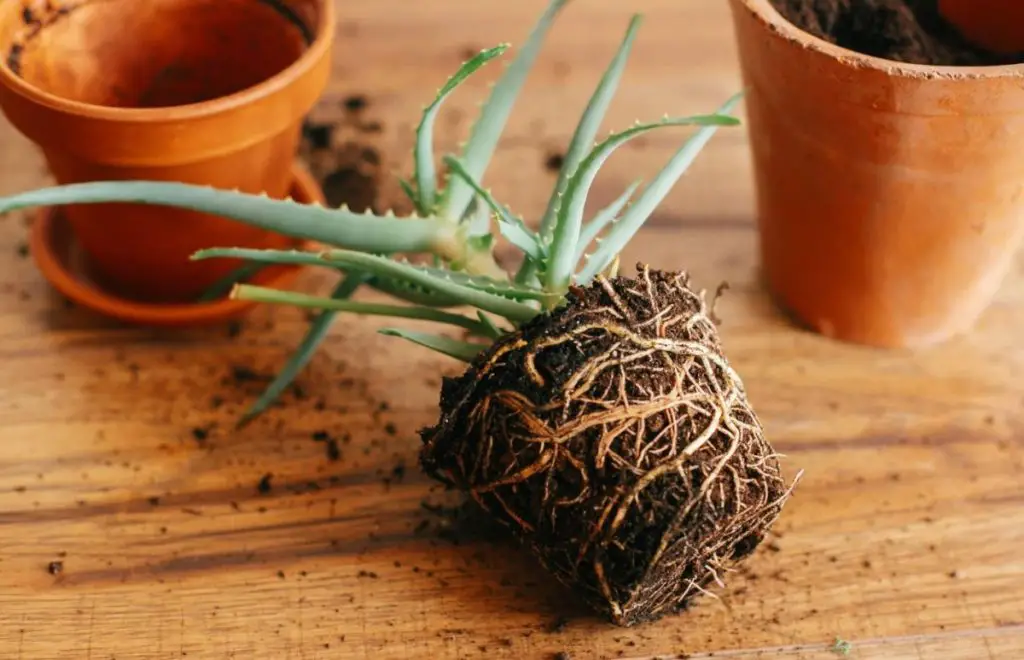
Step 1: Remove the Aloe From Its Pot
- Gently turn the pot sideways and ease the aloe out.
- Tap or squeeze the pot if the plant is stuck.
- Support the base of the plant to avoid breaking leaves.
Step 2: Shake Off Old Soil
- Loosen the root ball and shake off as much old soil as possible.
- Use your fingers or a small tool to gently break up compacted soil.
Step 3: Inspect the Roots
- Look for signs of root rot (black, mushy roots) or dead roots (dried and brittle).
- Trim off any damaged roots with sterilized scissors or a knife.
Step 4: Let It Dry (Optional but Recommended)
- Allow the plant to sit in a shaded area for 1–2 days to let cut roots callous over.
- This reduces the risk of root rot after replanting.
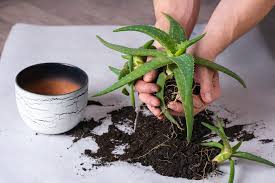
Step 5: Fill the New Pot With Soil
- Add a base layer of soil mix.
- Position the aloe so that the base of the leaves is above the soil line.
- Fill in around the roots, gently pressing the soil down.
Step 6: Do Not Water Immediately
- Wait 3–5 days before watering to allow roots to settle and heal.
- This is crucial to prevent rot.
How to Replant Aloe Vera Pups (Offsets)
Aloe vera produces pups or offsets—miniature versions of the parent plant that grow from the root system.
Steps for Replanting Aloe Pups:
- Separate pups with at least 2–3 leaves and a few roots.
- Let them dry for 1–2 days until the cuts callous.
- Plant each pup in its own small pot with succulent mix.
- Wait several days before watering to prevent rot.
Replanting pups is a great way to propagate aloe and share it with friends or expand your home garden.
Common Mistakes to Avoid When Repotting Aloe
Don’t let these missteps ruin your aloe’s repotting:
- Overwatering after repotting: This is the #1 cause of root rot.
- Using the wrong soil: Regular potting soil retains too much moisture.
- Choosing a pot without drainage: Aloe needs to dry out between waterings.
- Repotting during dormancy: Stick to spring or early summer if possible.
- Not trimming damaged roots: Always remove black or mushy roots before replanting.
Aftercare: What to Do After Repotting Aloe
Once your aloe is snug in its new pot, here’s how to care for it:
- Light: Place in bright, indirect sunlight for a few days, then return to its normal spot.
- Watering: Wait 3–5 days before the first watering. Then water deeply but infrequently—every 2–3 weeks depending on temperature and humidity.
- Feeding: Wait about a month before fertilizing. Use a diluted cactus fertilizer once in spring and again in summer.
- Pest Check: Keep an eye out for pests like mealybugs or fungus gnats, which may appear after repotting.
FAQs About Repotting Aloe Plants
A: Every 2–3 years, or whenever it becomes rootbound or outgrows its container.
A: Yes, but it will take time for the plant to develop roots. Let it callous, then plant in dry soil and mist occasionally until roots form.
A: No—wait 3–5 days after repotting before watering to reduce the risk of root rot.
A: It’s better to use a cactus or succulent mix. Regular soil holds too much water and can cause root rot.
A: Yes. As long as the base and roots are healthy, it will regrow. Broken leaves won’t regenerate but may be used for propagation or gel extraction.
Final Thoughts
Repotting aloe vera may seem intimidating at first, but it’s a simple and rewarding task that promotes your plant’s health and longevity. Whether you’re repotting an aloe plant for the first time or dividing offsets to propagate, the key is patience and attention to detail. With the right pot, soil, and care, your aloe vera will thrive for years to come.
So now that you know how to repot aloe vera, it’s time to roll up your sleeves and give your green friend the fresh start it deserves!