
Overview
Garlic is an awesome plant, it is satisfying to grow, but where magic is involved, is when the time comes to cure it. Are you confused about how to arrange a cure of garlic?
Then this guide will help you know all about it. Properly cooked garlic not only preserves it in the months to come but also intensifies the strongly flavored dichotomous taste of garlic.
So let us consider the process from the point of garden to pantry.
What Does It Mean to “Cure” Garlic?
Garlic is cured by merely drying it at the appropriate conditions. At the time of harvesting, garlic has a lot of moisture. Storing it as soon as possible, it might rot or develop mold. Fill in the solution of it, and:
- Dry out the outer layers
- Seal the cloves inside
- Extend its shelf life
- Deepen its flavor
This method transforms garlic from a fresh vegetable into a long-lasting kitchen staple.
When Should You Harvest Garlic?
Timing matters when curing garlic. Here’s how to know it’s ready to harvest:
- Lower leaves have turned brown, while 4–6 upper leaves are still green.
- The bulbs feel firm and are fully formed.
- The plant has stopped producing new leaves.
Early harvesting will lead to small under-developed cloves. A long wait also splits apart the cloves and becomes difficult to preserve.
How to Cure Garlic After Harvest
Once your garlic is ready, curing starts immediately. Follow these steps for best results:
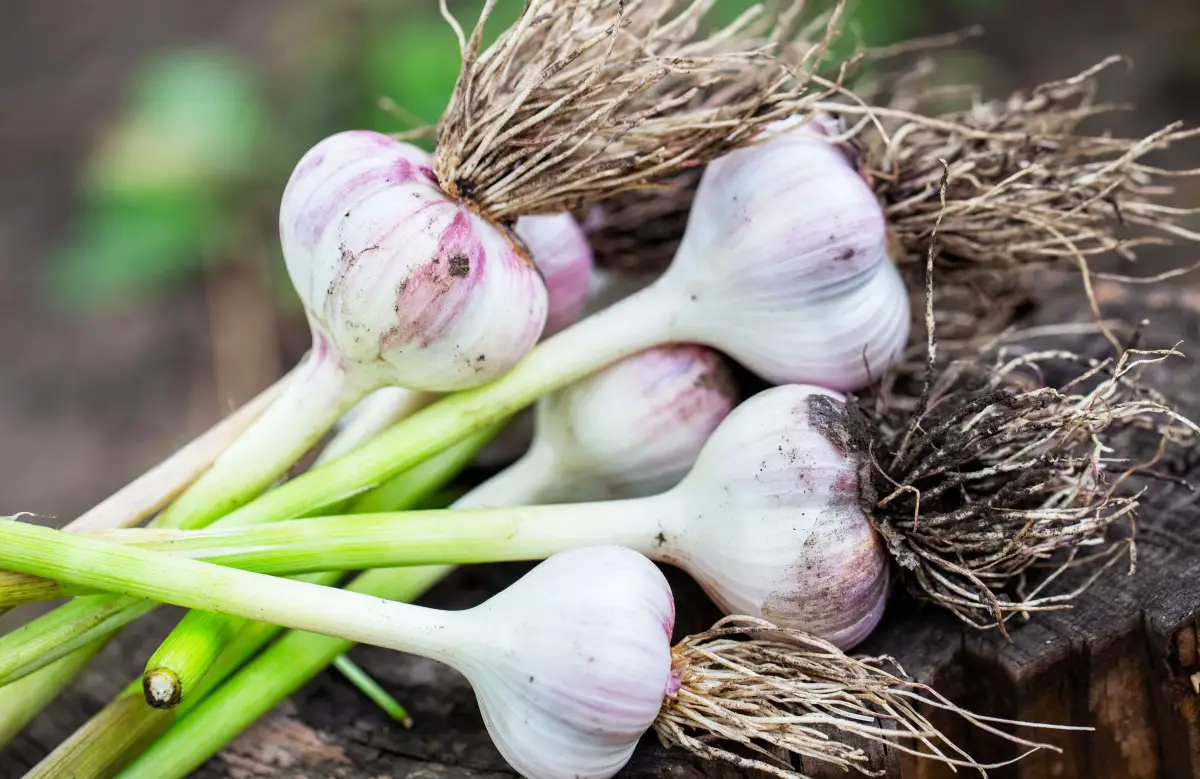
Step 1: Uproot Garlic Carefully
Never pull out garlic by the hands- this will bruise or break it. Instead:
- Loosen the ground around every bulb with the help of a garden fork or a shovel.
- Take every plant by its roots with care.
- Do not remove the stalk and roots as yet.
Note that at this point, garlic is sensitive.
Step 2: Skip the Wash
Do not rinse your garlic off. curing is the enemy to water.
- Rather, swipe off the bigger chunks of dust on your hands.
- Allow the soil that is left to dry-off automatically when curing.
On washing, moisture is introduced that may result in mold or rot.
Step 3: Pick the Perfect Curing Spot
Garlic needs a space that’s:
- Warm (75–85°F / 24–29°C)
- Dry
- Shaded (away from direct sun)
- Well-ventilated
Options include:
- A shaded porch
- A barn or garage with airflow
- A ventilated attic
- Indoors with fans
Avoid basements or areas with high humidity.
Step 4: Arrange the Garlic for Airflow
There are two ways to cure garlic:
Option 1: Hanging in Bundles
- Plant group 5-10.
- Tie off the stalks to the twine or rubber bands.
- Put them to dry nails, hooks, or drying rack, upside down.
Option 2: Laid Out Flat
- Fold a screen, drying rack or mesh shelf.
- Place out bulbs in one layer.
- Bulbs should not make contact.
Both of these will do, but make sure that both bulbs are reasonably well ventilated.
Step 5: Let Garlic Cure for 2–4 Weeks
This step is where patience pays off. Garlic typically takes:
- 2–3 weeks in dry climates
- Up to 4 weeks in humid areas
How do you know it’s ready?
- Leaves are crispy and brown.
- The roots are hard and parched.
- Skins are papery.
- Bulb necks (point of stem and bulb) are dry and tight.
Avoid handling too much during this time. Let nature do the work.
Step 6: Clean and Trim
Once garlic is cured:
- Discard 1 inch of the bulb (except if you are braiding).
- Cut back the roots, to approximately 1/4 in.
- Take off soiled outer skins, yet leaving some to cover the cloves.
Be gentle, don’t peel too much. The outer skins help garlic stay fresh during storage.

How to Store Cured Garlic
Storing garlic properly is just as important as curing. Here’s how to do it:
- Temperature: 50–60°F (10–15°C)
- Humidity: Low
- Light: Keep in a dark place
- Airflow: Use mesh bags, baskets, or paper bags
Avoid:
- Plastic bags (they trap moisture)
- Refrigerators (they cause sprouting)
- Sealed containers
Properly cured and stored garlic can last 6–12 months, depending on the variety.
Hardneck vs Softneck Garlic
Not all garlic types store the same way:
Softneck garlic (common in grocery stores):
- Best for long-term storage (8–12 months)
- Great for braiding
Hardneck garlic (grows well in cold climates):
- Richer flavor
- Stores for 4–6 months
Choose softneck if you’re storing for winter, and hardneck for strong, short-term use.
Bonus Tip, Braiding Garlic for Storage
If you’ve grown softneck garlic, braiding is a traditional and functional storage method.
Here’s how to braid garlic:
- Cured stalks should stay intact.
- To prevent stems from breaking easily, spray them lightly with water (before braiding).
- Braid like hair, and weave fresh bulbs in the braid.
- The end two, tie in with a piece of string, and hang.
It looks great in the kitchen and keeps garlic accessible.
Common Garlic Curing Mistakes to Avoid
Many gardeners make small errors that lead to mold, rot, or short shelf life. Watch out for these:
| Mistake | Result |
| Washing garlic | Causes mold and rot |
| Storing before fully cured | Spoils quickly |
| Curing in direct sunlight | Bulbs overheat and spoil |
| Poor air circulation | Leads to fungus or mildew |
| Plastic storage | Traps moisture |
Avoiding these mistakes will help your garlic last longer and taste better.
What If It’s Raining at Harvest Time?
If weather doesn’t cooperate:
- Cart off garlick dangerous straight away.
- Put box fans to amplify the air flow.
- Lay out racks of garlic in a garage or a spare room.
- To alleviate the moisture inside a house, a dehumidifier could be used.
Garlic still cures well indoors, it just takes longer. Never leave wet garlic outside.
Can You Use Fresh Garlic Without Curing?
Yes, you can use garlic immediately after harvest! It will be:
- Bland in taste
- Fleshy and unskinning
- Not long lasting (won t be stored)
Use fresh garlic for short-term cooking. But if you want to store it for months, curing is essential.
How to Tell If Garlic Is Properly Cured
Look for these signs:
- Crispy skins which are papery and rustle.
- Well pressed, firm cloves.
- Stems are deserted and hard.
- There was no green moisture in the neck.
- Bulbs are not green or mouldy smelling.
If all signs point to dry and firm, you’ve cured it right!
Final Thoughts
Garlic curing is one of the most effective though simple procedures of converting a freshly grown plant into a household pantry product. Keep reading whether you are an amateur grower or a longtime gardener, we managed to learn how to cure garlic and keep our buildup within reach for almost several months.
Allow your garlic to dry, keep it properly and you will be using your own flavorful bulbs well after the harvest is at hand.